Tubeless Troubleshooting
A guide to staying inflated.
Tubeless tire and rim technology provide riders with numerous advantages, such as enhanced puncture protection, improved compliance, and reduced fatigue. It's important to note that various components of a tubeless system may require periodic maintenance, inspection, cleaning, or replacement to ensure optimal performance.
This article will guide riders in troubleshooting common issues related to air leakage or premature deflation in their tubeless systems. Watch this VIDEO for instructions on how to complete initial set up of a tubeless system.
Tubeless Anatomy
A tubeless system for Zipp wheels, as well as many other tubeless setups, consists of several key components. These include tubeless-compatible rims, tubeless tire sealant, tubeless valve stems, and tubeless-specific tires. The rims are designed with features like airtight sealing channels and a proper bead profile to create a secure seal with the tire. Tubeless tire sealant is used to seal punctures and small cuts, preventing air leakage. Tubeless valve stems are essential for inflation and deflation of the tire, as well as maintaining the airtight seal. Lastly, tubeless-specific tires are designed with a reinforced bead and airtight construction to ensure proper compatibility with the tubeless system. It's important to have all these components to ensure a reliable and functional tubeless setup.
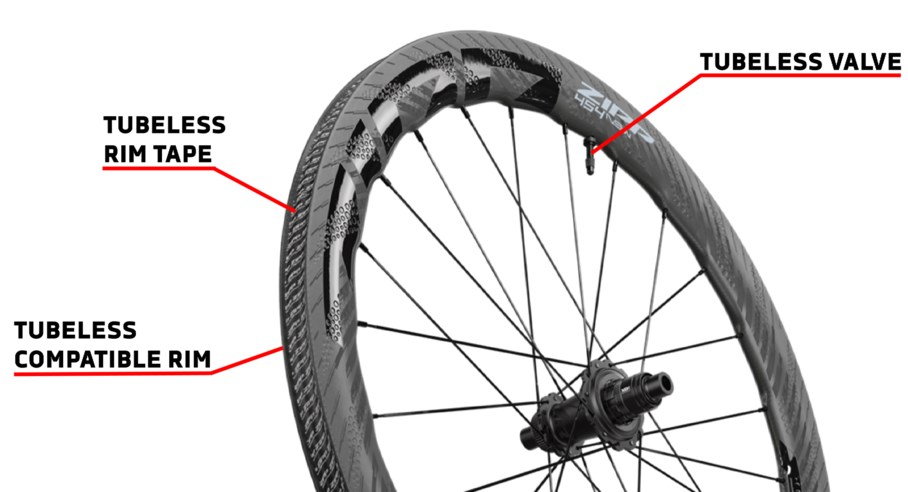
Tubeless Compatible Rim
Tubeless compatible rims for bicycles are specifically designed to support the use of tubeless tires. These rims feature certain characteristics that enable a secure and airtight seal between the tire and rim, eliminating the need for an inner tube. They typically have a hooked or hookless bead profile, airtight sealing channels, and a tighter fit to ensure a reliable tubeless setup. Tubeless compatible rims offer benefits such as improved traction, reduced rolling resistance, and the ability to run lower tire pressures for enhanced comfort and performance on various terrains.
Since 2020, Zipp has utilized Hookless Technology in their rim bead. This provides many benefits such as running lower pressures and reducing pinching. Please watch the video below on Zipp's Hookless technology.
Tubeless Rim Tape
Tubeless rim tape for bicycles is a thin, adhesive strip that is applied to the inner surface of the rim. Its primary function is to seal the spoke holes and create an airtight barrier, allowing the tire to hold air in a tubeless setup. The tape is usually made of durable materials like nylon or PVC, and it provides a smooth surface for the tire bead to seat properly. It acts as a crucial component in preventing air leakage and ensuring the effectiveness of the tubeless system.
The width of the rim tape used is critical to the sealing of the rim and tire. Different internal rim widths will require different widths of rim tape. Zipp will specify the recommended rim tape width for each of its rims in the Zipp Spare Parts Catalog.

Rims will have differing internal widths, meaning they may require different width tapes.
Tubeless Valve Stems
Tubeless valve stems for bicycles are specially designed components that serve as a two-way passage traveling through your rim and into the tire. They feature a hollow tube with a removable core that allows for easy inflation and deflation of the tire. The valve stems are typically made of lightweight materials like aluminum or brass and are equipped with rubber gaskets or o-rings to ensure a secure and airtight seal. They play a crucial role in maintaining tire pressure and preventing air leakage in tubeless systems.

Valve stems come in a host of different sizes, this will depend upon the depth of the rim itself. To find out what valve stem length you need for your Zipp wheels please see below or visit our Zipp Spare Parts Catalog.
- Zipp 3Zero Moto: 30 mm
- Zipp 101 XPLR: 30 mm
- Zipp 303S: 60 mm
- Zipp 303 Firecrest: 60 mm
- Zipp 353 NSW: 60 mm
- Zipp 404 Firecrest: 80 mm
- Zipp 454 NSW: 80 mm
- Zipp 808 Firecrest: 100 mm
- Zipp 858 NSW: 100 mm
Tubeless Compatible Tires
Below is a link to the most recent road tire compatibility chart for Zipp wheels with a hookless rim-tire interface according to each tire manufacturer by make and model. This list is for road wheels and tires only. Gravel tubeless tires being wider and intended to be used at lower pressures are generally approved for usage with hookless wheels, if you have questions please check with your tire manufacturer.
Zipp hookless rims meet specifications as outlined by ISO and ETRTO. Zipp also works directly with tire manufacturers to gain compatibility with their tires. Tire fitment is the responsibility of the tire manufacturer. The list below represents compatibility as reported by the manufacturers for their respective tires. If you have questions about tire fitment, we recommend you reference the tire manufacturer’s website or contact them directly. The tire compatibilities shown below are as reported by the respective tire manufacturers and do not represent an endorsement by Zipp of that brand or tire.
Zipp hookless rims should only be used with hookless-approved tubeless tires. Tubes are okay, but the tire must have a tubeless bead.
For road bike tire compatibility, please view our Hookless Road Tire Compatibility Guide.
Working through pressure loss
Tubeless systems can encounter two main issues: road-side flat tires caused by punctures and air loss unrelated to tire damage. Punctures occur when foreign materials lodge themselves in the tire, leading to a sudden deflation. Meanwhile, expedited air loss may happen during longer rides or when the bike is not in use. Both tubed and tubeless systems naturally lose some air over time due to air escaping through the tire and tube material.
While a 10-20% air pressure loss over 24 hours is normal, a significant loss of 50-100% within that timeframe, especially when the bike is at rest, indicates a leak within the tubeless system. Performing the following checks can help identify the source of the leak and enable you to take the necessary steps to address it. It's essential to be aware that CO2 gas used for inflation may leak faster than oxygen, which should be considered in your assessment. Although a CO2 canister will get you inflated to complete your ride and get you home, be sure to replace the CO2 with ambient air for longer air retention.
Tools you may need for this article
There are a few handy tools that will make some of the below checks easier. These are listed below:
- Spray bottle with soapy water
- Valve removal tool
- Tubeless rim tape
- Presta valve internals
- Bicycle pump
- Tire levers
- Tire plug system
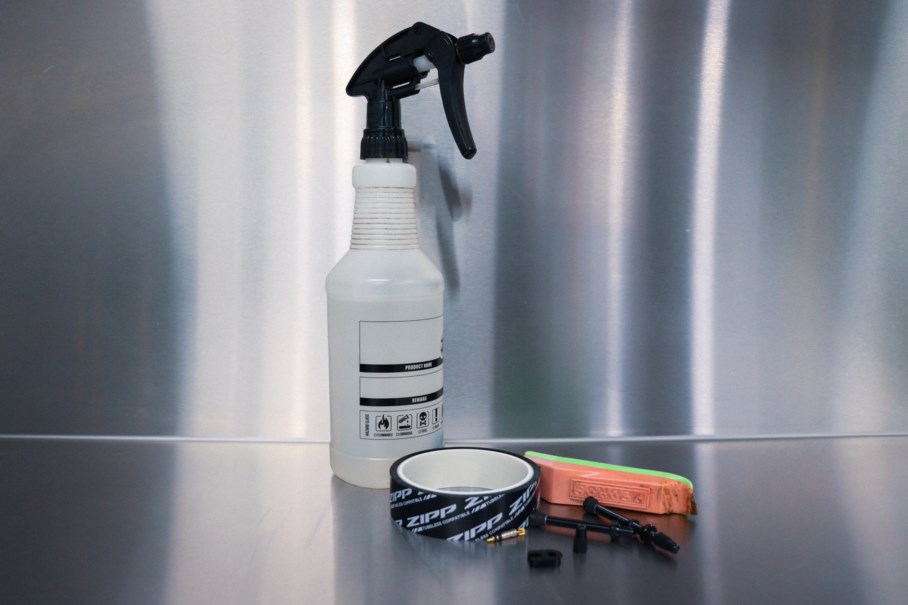
Some of the tools you will need for this article
Road side puncture repair for tubeless
Tubeless systems indeed provide better puncture resistance, thanks to the internal sealant. However, there are still situations where larger holes or punctures may occur during your ride, requiring attention to continue cycling.
With tubeless tires, there are a couple of additional fixes available. Updating your spares kit with the right tools is essential to address these issues effectively. Our team has prepared an informative video for road-side repairs, covering the following topics:
1. Fixing a puncture with sealant.
2. Fixing a puncture with tire plugs.
3. Fixing a puncture with a tube.
Having these skills and tools at your disposal will empower you to handle various puncture scenarios while enjoying a smooth and uninterrupted cycling experience.
Deflation with no tire damage
If you notice air loss in your tubeless system and have confirmed that there are no punctures in the tire, here are some checks to identify the potential source of the problem:
1. Some Air Loss is OK: A little bit of pressure loss is normal due to air molecules permeating through the rubber over time. Losing 10-20% of pressure overnight is generally nothing to worry about. However, if you experience a loss of 50% or more within a 24-48 hour period, it may indicate a significant issue.
2. Sealant: Tubeless sealant plays a crucial role in sealing the tire to the rim and fixing punctures. Over time, sealant may need to be topped up or replaced, depending on the brand and environmental factors like temperature and humidity. Inactive bikes are more likely to have dried sealant pooled in the tire, which could result in an unbalanced wheel, as well as a system that does not seal properly.
3. Issues with the valve: Air loss can occur from the valve stem due to damage or incorrect functionality. Checking the valve's condition is essential for proper sealing.
4. Damaged Rim Tape:Tubeless systems use plastic adhesive rim tape to seal the rim and hold air. Check for damage to the tape, especially if you experience fast air loss. Using soapy water can help identify any air leakage around the spoke holes of the rim.
By performing these checks, you can pinpoint the issue and take appropriate measures to ensure your tubeless system seals correctly and maintains optimal air pressure during your rides.
1. Air loss
We mentioned above that air loss is normal, but if you have lost 50% or more air in a 24-48 hour period, a big question to ask is, "Was the tire previously inflated with a CO2 cartridge?"
If the last inflation was done with a CO2 inflator, which relies on carbon dioxide (CO2) to inflate the tire, there might be a higher rate of air loss due to CO2's solubility in rubber being five times faster than oxygen (O2). If this was the case, it's recommended to release most of the CO2 from the tire and reinflate it with regular air once you have access to a pump. If this is not the case, please proceed to the next steps.
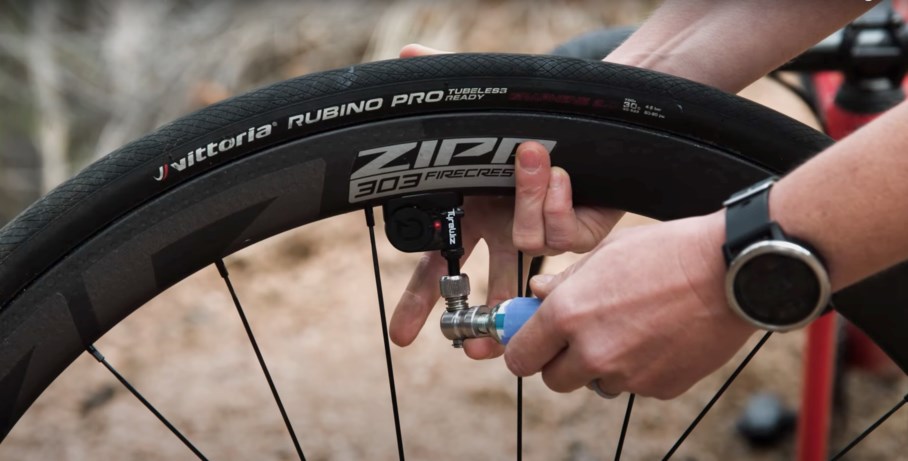
Tire and tubes inflated with C02 will drop air faster than atmospheric air
2. Sealant
Tubeless sealant for cycling is a liquid compound specifically designed for use in tubeless tire systems. It serves two main functions:
1) Puncture sealing: The sealant is added to the tire before it is inflated. If a puncture occurs during a ride, the sealant quickly seals the hole by forming a temporary plug. This helps prevent air from escaping, allowing you to continue riding without needing to stop and fix a flat.
2) Tire-to-rim sealing: Tubeless sealant also plays a crucial role in sealing the tire to the rim. It creates an airtight seal between the tire bead and the rim, allowing the tire to hold air without the need for an inner tube.
Tubeless sealant is typically a mixture of latex or synthetic materials, combined with small particles such as microfibers or sealing crystals. These particles help to plug punctures and maintain the effectiveness of the sealant over time. The exact formulation of the sealant can vary between brands, with some offering specific features such as enhanced longevity or lower weight.
As the tire rotates during riding, the sealant is distributed throughout the inside of the tire, coating the inner surface and providing continuous puncture protection. Over time, the sealant may dry out or break down, so regular maintenance and topping up are necessary to ensure its effectiveness and keep the tubeless system functioning optimally.
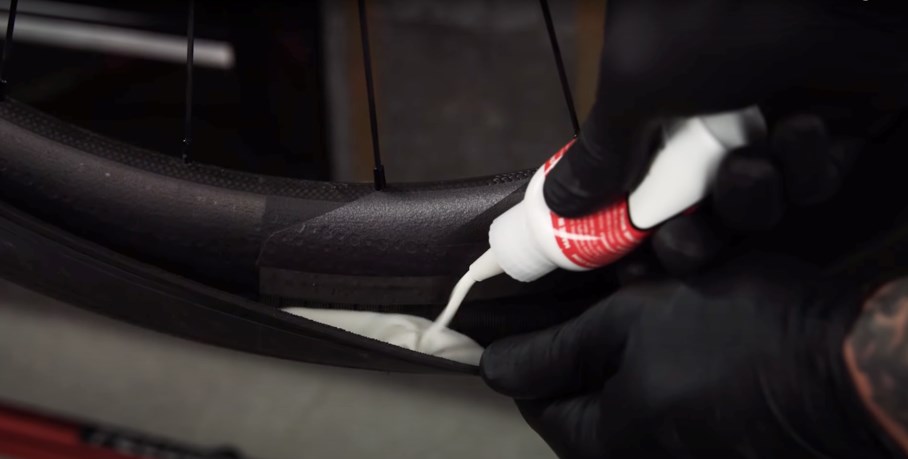
Sealant is an integral component of a tubeless system
Bike has not been in use
If your bike has been stationary for quite some time, like a cold winter or waiting for you to get back on the bike after a trail crash, it is important to note that your sealant may be dried in the tire itself and it is important to check the internal of the tire.
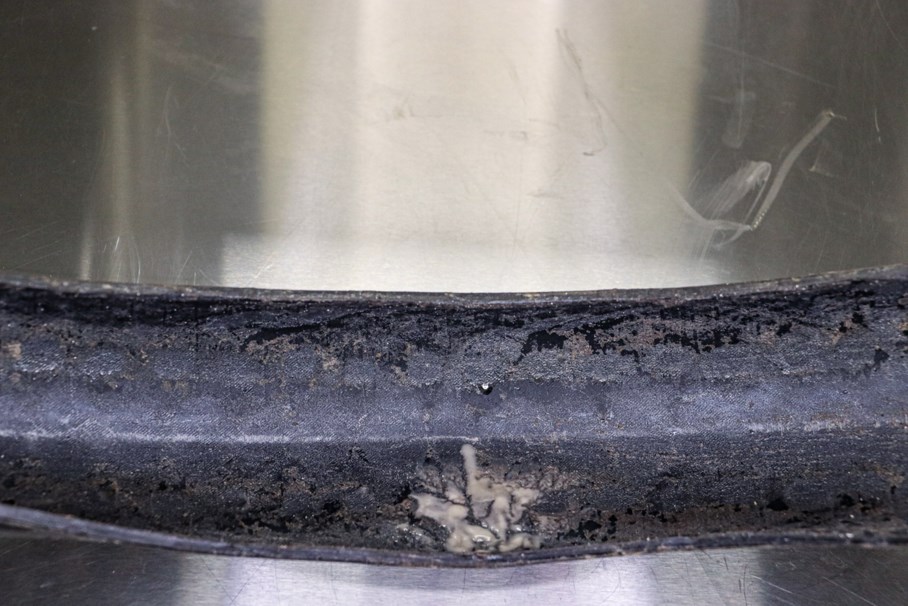
Sealant will dry over time and if stationary will pool in one area
Tip: When storing your bike, make sure that the wheel is oriented with the valve at the highest point of the wheel. This will prevent the valve from making inadvertent contact with the pool of sealant, which settles at the lowest point of the wheel.
3. Issues with the valve
If you notice fast air loss in your tubeless system, check the valve stem for leaks. The lock nut and the valve itself could be causing the problem, resulting in an audible hiss of air or sealant leakage. Tightening the lock nut and ensuring the valve is well-seated can help resolve the issue. An excellent check for this beyond noise is utilizing soapy water to see if there is any bubbling occurring at the stem itself.
Check the lock nut: It is always worth checking the lock nut to make sure that the system is finger-tight and not freely spinning. Many screw-on pumps can loosen this nut over time, causing a non-consistent sealing and allowing air to escape. Valve installation can be found on our Zipp Hookless Wheel and Tubeless Tire Setup video.
If the valve is tight but still losing air, then please be sure to work through the following checks.
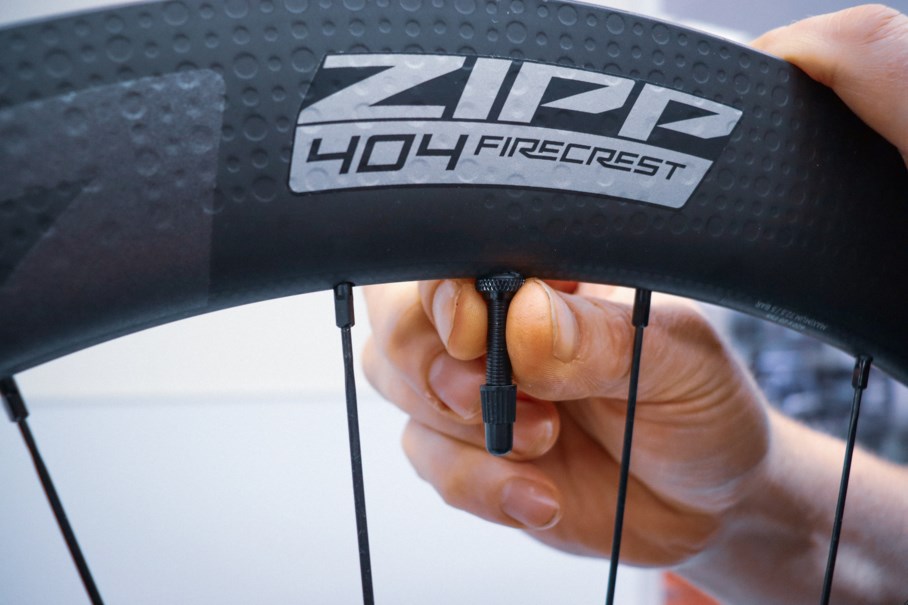
Your fingers are all you need to tighten the valve stem

This is a big no! A great way to damage your rim
If the leaking continues, there might be damage to the valve seat, located beneath the locking nut that engages with the rim. Another possibility is damage to the o-ring at the base of the valve, which is responsible for sealing the rim and protecting it from damage during tightening. Over-tightening, under-tightening, or improper removal of the valve can cause damage to the o-ring. Checking and replacing the o-ring if necessary can help resolve the issue.
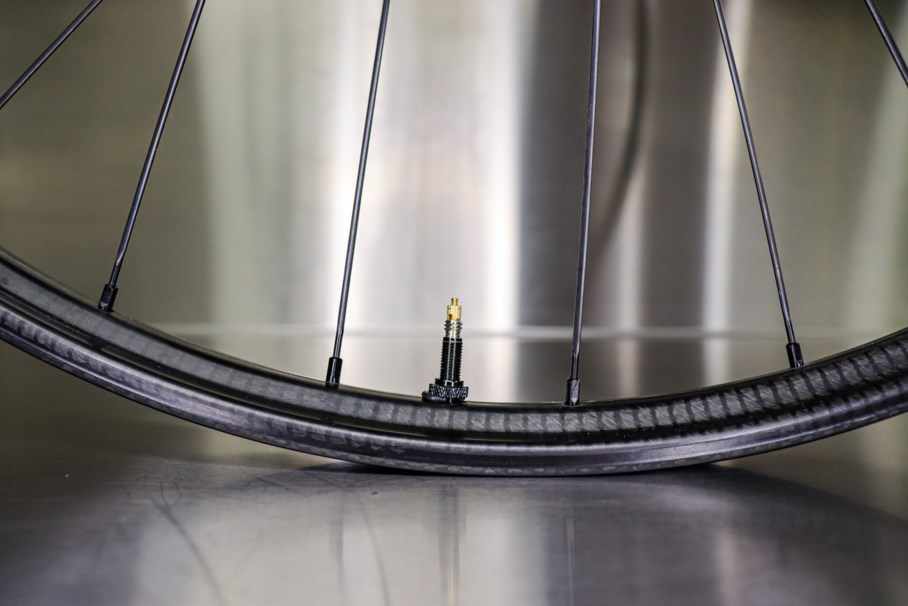
The o-ring under the locking nut has been cut and it is poking out - allowing air to escape
Damage to the valve can occur when using certain press-on pumps incorrectly, resulting in harm to the top of Presta valves. If the non-removable brass cap cannot be tightened properly due to this damage, it's advisable to replace the valve for proper sealing and functionality.
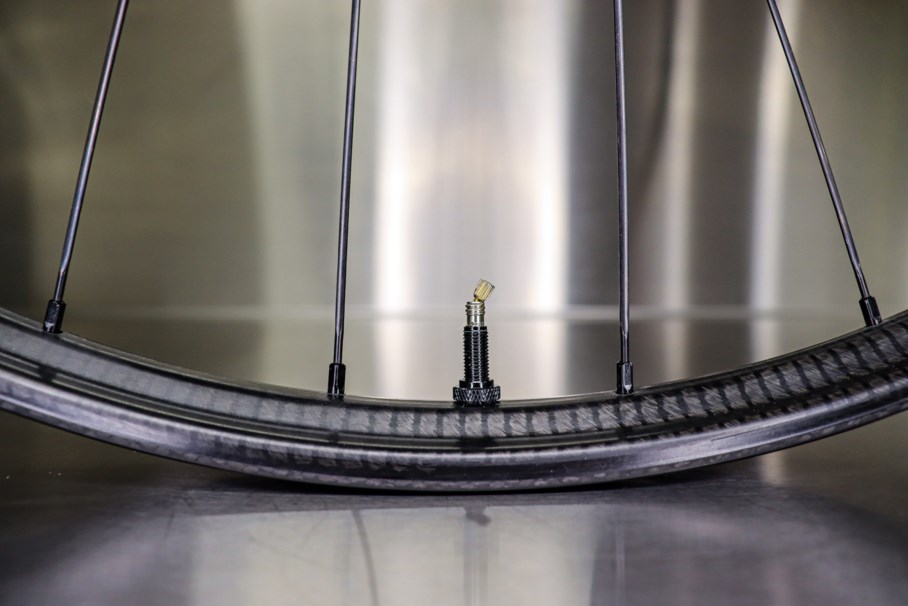
A bent valve can mean issues with inflations as well as the tire losing air
4. Damaged rim tape
In tubeless systems, plastic tape is used as a rim strip to seal the rim, allowing air to be trapped within the tire and rim. This tape serves the purpose of protecting the nipples and spoke interface from coming into contact with the tubeless sealant.
If you suspect that air is leaking from your tubeless system, there are a few steps you can take before removing the tire to identify the source of the leak:
- Fast loss of air: When inflating the tire, listen for any air hissing sound around the nipples or the spoke/rim interface of the wheel. This can indicate a potential issue with the rim tape. The most visible display of this will be a build-up of sealant around the nipples, which we can see below.
- The biggest culprit in damaging rim tape is the use of tire levers for installation of the tire. We recomend rolling the tire on by hand to limit any damage to the rim tape.
- Soapy water test: If you're unable to locate the source of the leak by sound, you can create a mixture of soapy water and spray it around the nipple area of the rim. Any escaping air will create visible bubbles, indicating a leak.
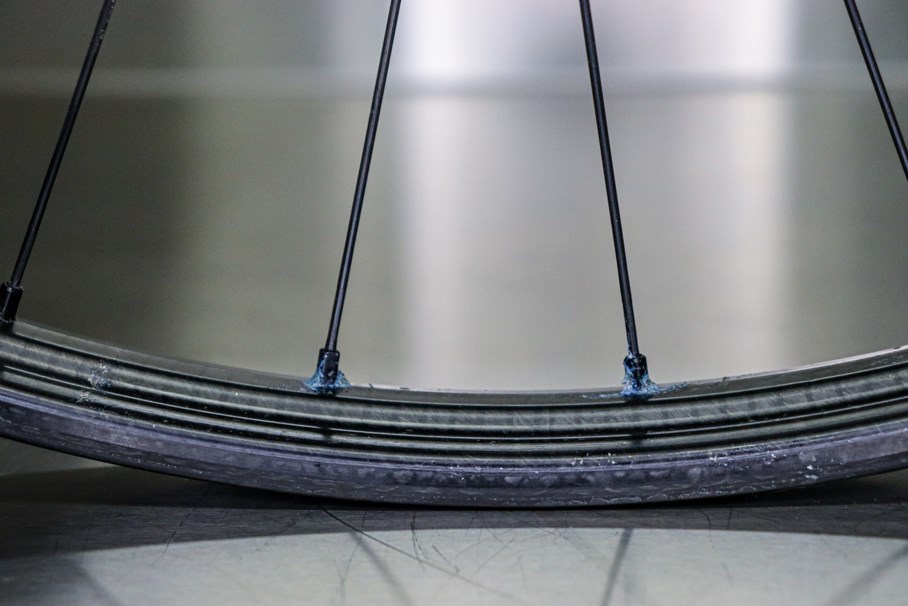
Note the blue sealant on the nipples, this is a tell-tale sign that the rim tape has been compromised
The final visual check is to remove the tire to inspect the rim tape. Identifying any damage to the rim tape is important, as it can cause air leakage in the tubeless system. Addressing any issues with the tape will help maintain proper sealing and ensure the system functions as intended.
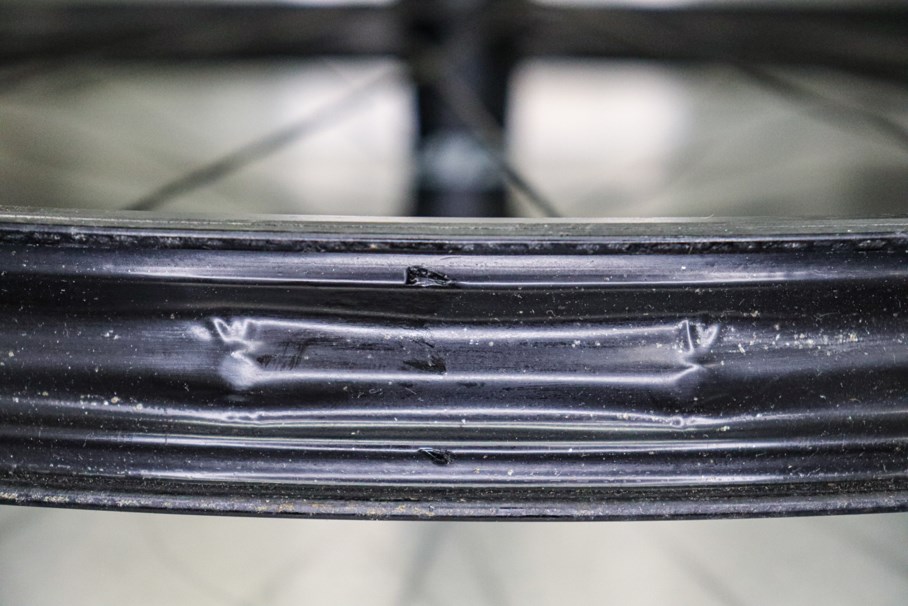
Similar to a snake bite on a tube, in extreme situations rim tape can also be damaged against surfaces
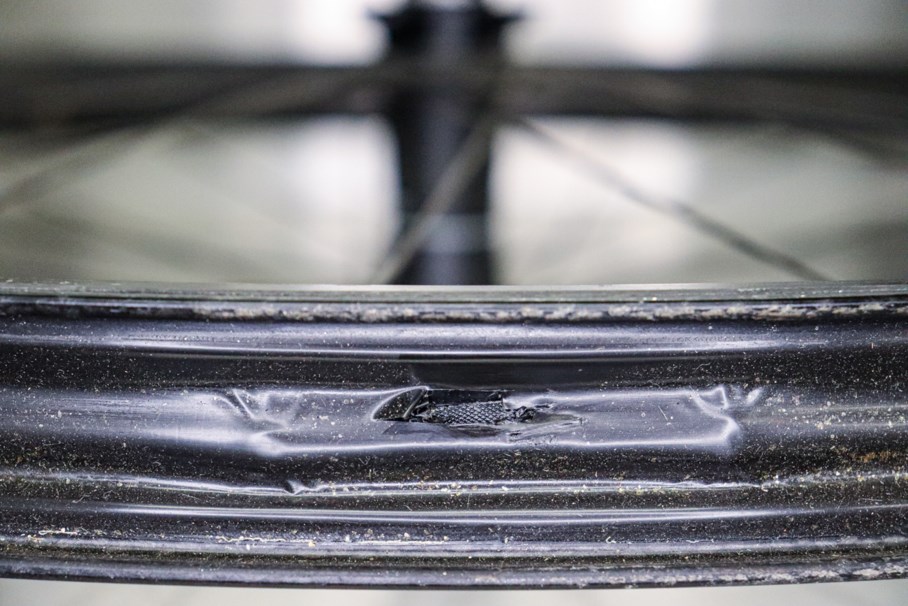
Tears to the rim tape will allow air to escape
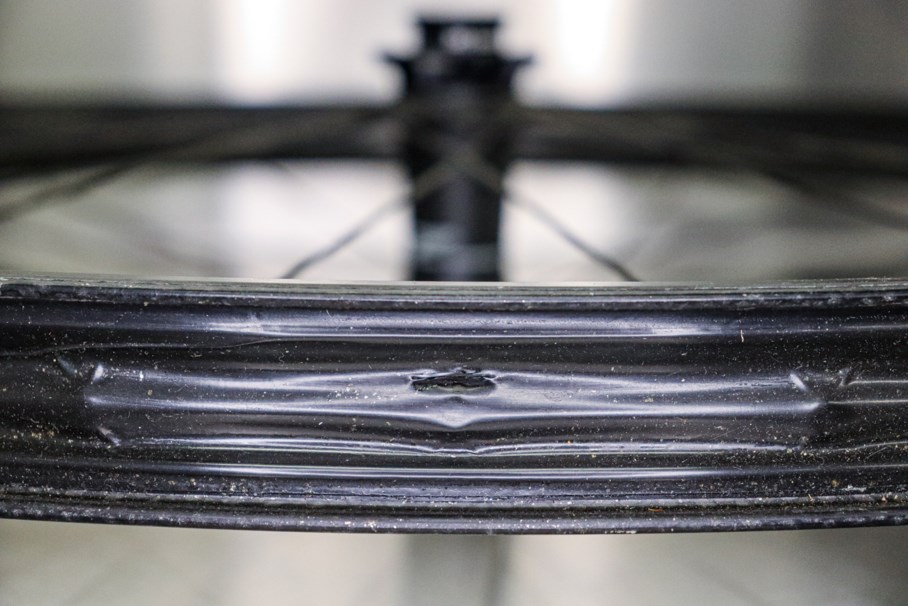
Tires always need to be installed by hand, the use of tire levers can easily damage the tape
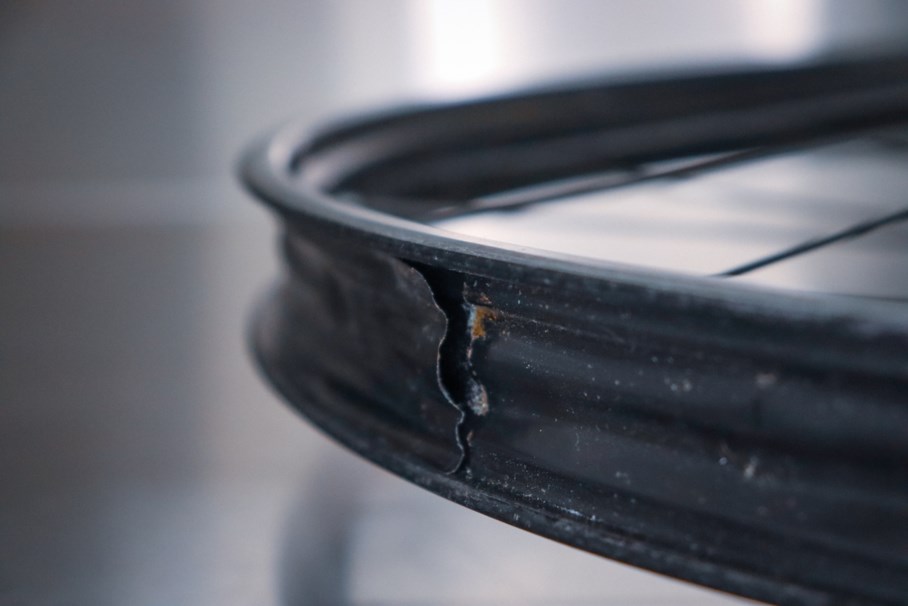
Adhesive tape can also lift over time, this is important to check
Difficulty inflating tires
If you're having trouble with air getting into your tubeless system, it might be because the tubeless sealant has caused the valve to become clogged over time. While sealant is great for sealing cuts and sidewall punctures in tires, it can sometimes create valve-related issues. To prevent and address this problem, follow proper procedures for valve placement during storage and inflation.
If you do encounter this issue, it's a straightforward fix. You can either replace the valve if it's removable or replace the entire stem and valve assembly if it's not. If the valve core is removable, cleaning it with pipe cleaners can be helpful. However, for valve options without a removable core, you may need to replace the entire valve and stem.
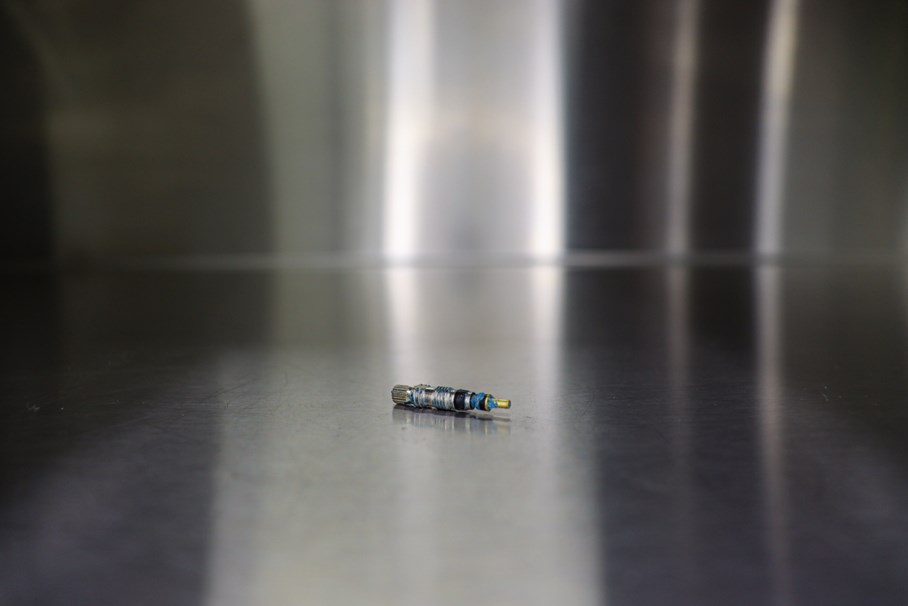
A clogged valve core can make it hard to inflate your tire.
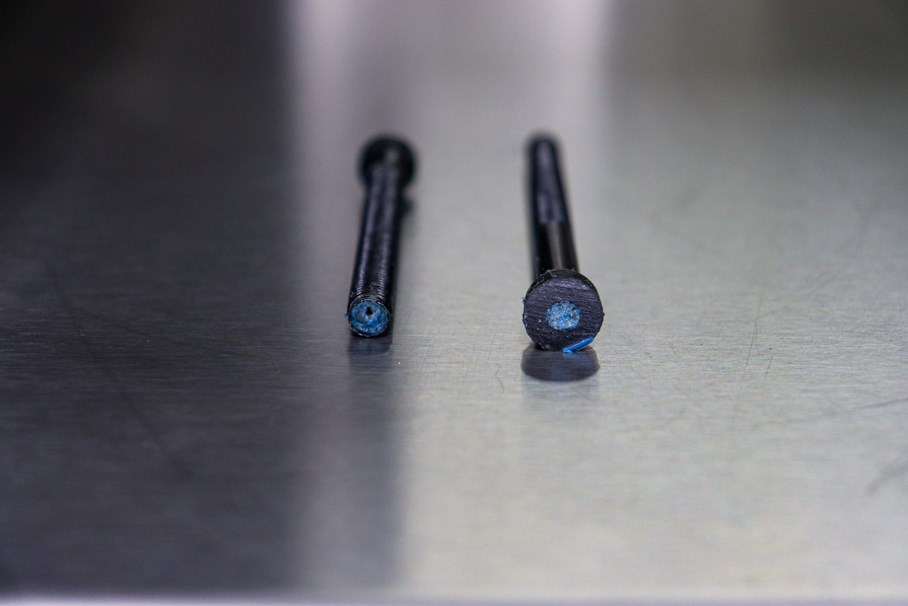
Clogged valve stems will have sealant that is dried within them
Tubeless FAQ
- Do I have to add sealant every day? Adding sealant to your tubeless system is not required on a daily basis. The sealant only needs to be added in two situations: after a puncture occurs or when the manufacturer specifies a replacement interval for the sealant.
- Do I have to reseat the wheel every day? Re-seating the wheel is not necessary on a daily basis as long as the tire is holding air properly. Once the tire is properly seated and inflated, it should stay in place even when the bike is stored.
- How do I maintain the sealant in my wheel? To maintain the sealant in your wheel, there are a few things you can do. One is to ensure that your wheels spin 1-2 times per week, which can be achieved by going for regular rides. This helps to distribute the sealant and extend its lifespan. If your bike is going to be stationary for an extended period, setting reminders to spin the wheels or replacing the sealant when necessary will help maintain its effectiveness.
- How do I fix a flat? Fixing a flat on tubeless couldn't be simpler. There are actually more options then replacing a tube in a standard tubed system. Our Tuebless Road Side Repair video highlights the procedures
- Can I use tubes? You sure can! But remember fixing a flat on a tubeless system is usually straightforward and there are more options available compared to fixing a flat in a standard tubed system. You can refer to the video provided at the top of the article for instructions on how to perform roadside puncture repairs. **
- Do I need to unseat or remove the tire to top up my sealant? In most instances, no. As long as you are using a tubeless valve that has a removable valve core then you can use a sealant syringe to inject sealant through the valve once the air is removed.
- Do I need to use specific tires for tubeless or hookless? Yes. For any tubeless system, you will require a tubeless-compatible tire. Hookless is also its own standard and will require not only a tubeless-compatible tire but also one that is hookless-compatible. Zipp has a Tire Compatibility Guide on their website, also you can learn more about Zipp's Hookless technology
- When should I install new tubeless tape? When it comes to installing new tubeless tape, there isn't a specific service interval or shelf life. It's recommended to replace the tape if there is any damage or if you're experiencing sealant leakage through the spoke nipples. Please refer to our tubeless tape section above for more details.
- Can sealant damage the tape? Sealants can potentially damage the adhesive properties of the tubeless tape, but this is not a concern if the tape is installed correctly. Tubeless tape has a smooth side and an adhesive side. The adhesive may lose its 'stickiness' when exposed to fluids. Tubeless sealant, which contains sealing particles, can stick to the adhesive layer if it hasn't been compressed properly, leading to the tape unraveling.
- Are there any special steps to prepare tubeless for air travel? For air travel, the process is similar for both tubed and tubeless systems, but with tubeless, you need to pay attention to the tire bead. Tires must be deflated when traveling by air due to the increase in air pressure at higher altitudes. Leaving some air in the tubeless system (around 5-10 PSI) allows for pressure changes and helps keep the tire on the bead seat. If all the air is let out and the tire comes off the bead seat, it may be more difficult to prepare your bicycle at your destination.
- What size CO2 canister is recommended for tire repair and safe re-inflation? The recommended size of CO2 canister for tire repair and safe re-inflation depends on the specific needs, tire size, and rim combinations. For most road and gravel applications (up to 40c), 18g CO2 canisters are suitable and can provide enough pressure to continue riding. For MTB, 25g canisters are more beneficial due to the larger tire size.
- How do I know the correct pressure to use with my tubeless system? The team at Zipp has created an amazing online tool for you with their pressure calculator. Once you input rider and bike data the tool will calculate the recommended pressure for your wheels and ride type.
** While you have the option to use tubes with Zipp products, there are some considerations to keep in mind. Firstly, the tire used must still be approved for hookless rims. Additionally, the maximum pressure for Zipp road wheels remains at 73 psi. It's also important to note that using tubes may result in higher pressures compared to a tubeless system, which could lead to increased inefficiencies due to vibration losses and rolling resistance.
Looking to learn more?
SRAM has fantastic learning resources, such as our service website and SRAM Tech YouTube channel.