How to: Rear Derailleurs
The ultimate guide to adjusting SRAM rear derailleurs
Rear derailleurs and external drivetrain have a tough life, they are constantly exposed to all of the elements, while trying to make precise movements to keep your gears running smooth. There are a number of checks, adjustments and maintenance tthat all add up to optimal drivetrain performance.
This article aims to highlight the rear derailleur as a system and what is needed to maintain a smooth and accurate shift.
Want to skip ahead?
Is everything tight? | Derailleur hangers | Wear and tear | Compatibility | Fine Tuning | Chainlength | Chaingap
Tools
We're not going to lie here; there are a host of specific tools that all add up to optimal drivetrain performance. Some derailleur issues may not be reasonable or feasible to fix at home. But at the very least, being able to understand the theory will assist in understanding what is happening. The tools you need will depend upon whether you are using a mechanical shift system or our SRAM AXS wireless technology.
- Hanger Alignment Tool (exluding Eagle Transmission)
- Metric Allen Keys (all)
- Shift Cable Cutters (mechanical system)
- Grease (road systems)
- Threadlocker (MTB systems)
- Torque Wrench
- SRAM approved chain checker
Is everything tight?
If your gears have gone out of adjustment, check that your derailleur’s connection to the bike is tight. SRAM Road and MTB derailleur attachment bolts have specific torque values that must be adhered to.
When checking this, be aware that some movement between the rear derailleur attachment bolt and the derailleur body is normal. This movement is part of the derailleur’s design and does not impact shift performance.
- SRAM Apex 1x12 Mechanical
- Road AXS
- MTB Mechanical
- Eagle AXS
- Univeral Derailleur Hanger manual
- SRAM Eagle Transmission Manual
The other components that would be worth checking for any play or movement are:
- Derailleur hanger: Check your frame manufacturers torque setting, unless printed on the hanger itself.
- Cassette
- Wheel thru-axles or quick releases
- Freehub bearings
- Wheel bearings
Tighten any loose parts to the specifications outlined in the manual. If these parts do not stop movement after tightening to the correct torque, they could be worn and need replacement such as wheel bearings or freehub bearings.
Some components, like the bushing that runs on the outside of the mounting bolt, may have movement by design. If you are unsure if something is working as intended, please consult with your local bike shop.
Derailleur Hangers
**If you are using SRAM Eagle Transmission, none of this will apply.
A rear derailleur hanger, mech hanger, or simply a hanger as some mechanics call it, is a component that mounts to either your frame or dropout and provides a mounting point for your rear derailleur. The reason this is a separate part from the frame is that it can serve as a sacrificial component in the frame/drivetrain system. Why is that? Well, road and mountain bike drivetrains are external, which adds a host of benefits to serviceability and weight. A small downside though is they offer a large leverage point in case of impacts. If the hanger gets bent, it can often be bent back into place or replaced. However, if this mounting point were on the frame itself and it broke, it would mean replacing the entire frame, which can be quite expensive.
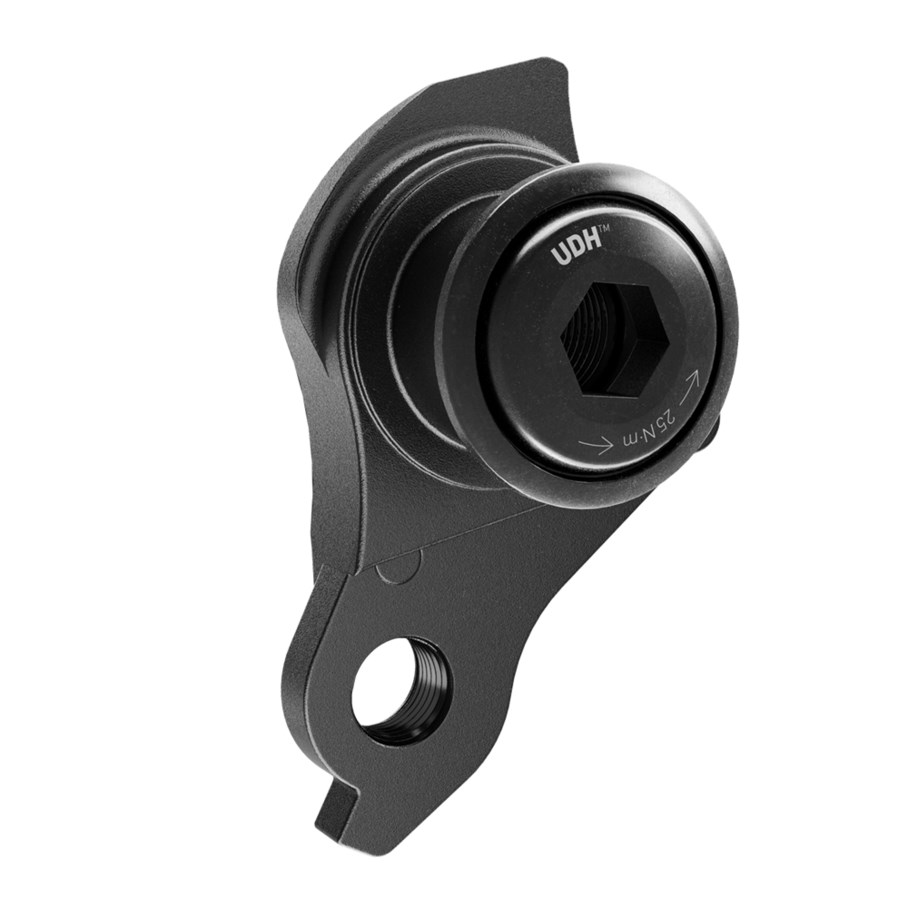
SRAM's Universal Derailleur Hanger make hanger selection a little easier for bicycle brands.
Because derailleur hangers are sacrificial, they are usually made from lighter metallic materials such as aluminum. This is so that, under harsh impacts, they can shear instead of bending into the frame and causing further damage.
External drivetrain systems use a consistent gap between each cog. Whether your bike uses a mechanical or SRAM AXS wireless system, each shift needs to move the same amount at the cassette. If the hanger is not aligned correctly, you may find that some gears shift fine, while others do not.
As the alignment of the derailleur hanger with your frame is the foundation for your gears to shift seamlessly, it is imperative that alignment is checked and adjusted if required before proceeding to any further steps. Regardless of how many adjustments you make, a bent derailleur hanger will still give you headaches with gear shifting. If you try to adjust the cable tension or derailleur position this is usually a sign of a misaligned derailleur hanger.
Please note that our Transmission components do not use a derailleur hanger. Instead, the hangerless interface of the derailleur is designed to align with the rear axle.
Bent Hanger Symptoms
A bent derailleur hanger is most commonly caused by a crash or impact. However, simply resting the bike on the drive-side can also lead to misalignment. Here are some symptoms:
- The visual alignment between the derailleur's upper pulley wheel and the cassette is askew. The cassette cog, chain, and upper derailleur pulley wheel should be in a straight vertical line. Check this after every crash or noticeable impact to the derailleur.
- Your chain shifts off the largest cassette cog into your spoke or off the smallest cog and into your frame. Incorrectly adjusted limit screws can also cause this, but if it wasn’t previously occurring, the hanger is likely bent.
- Gears shift and operate smoothly for some cogs but not in others. When you adjust the derailleur to correct this, cogs that previously shifted and operated smoothly no longer do.
How can you check hanger alignment?
Hanger alignment is not something that can be "eyeballed". This process should always be checked with a specific Hanger Alignment Tool. There are plenty of options available from reputable bicycle tool companies on the market. However, these tools can be quite expensive, so it's worth doing your research to determine whether it's best to purchase the tool yourself or simply take your bike to your trusted local bike shop for this alignment check.
Hanger alignment tools typically bolt into the threads of the hanger where your derailleur attaches. From this point, you will take multiple measurements in relation to the rear wheel to ensure the hanger is aligned correctly. For the best results, taking both up-and-down and side-to-side measurements in the middle will result in a well-aligned hanger across all planes.
If you find that the hanger is out of tolerance, realigning it will require some finesse and practice to get it back in shape. Many hangers are made of aluminum, a material that does not respond well to being bent repeatedly and can eventually shear. Take your time to incrementally bend the hanger back across multiple planes. Patience is key! There's always a chance that the hanger may break during this adjustment, especially if it has been adjusted multiple times before (as aluminum loses strength with each bend) or if it's just beyond the point of being able to be bent back into shape.
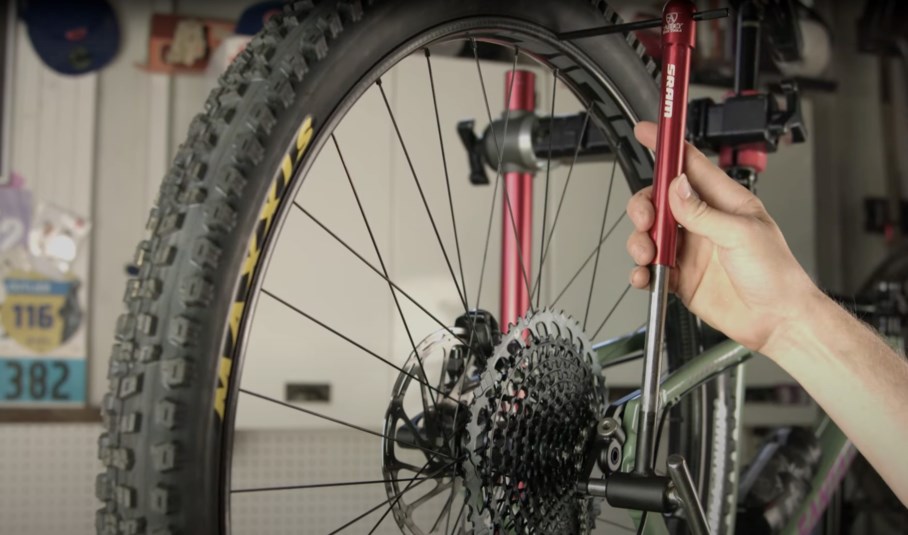
Hanger Alignment tools are a necessity for gear set up
But my hanger is brand new, it doesn’t need alignment!
A brand-new derailleur hanger should, in theory, not be bent. However, it's important to note that even new hangers should be aligned to your frame in accordance with the wheel/cassette. This means that your new or spare derailleur hanger should be installed and aligned with a hanger alignment tool before being used. Proper alignment ensures that the hanger fits your specific frame perfectly, as small variations can exist in frame manufacturing. Aligning a new hanger is a preventive measure to ensure smooth and precise gear shifting right from the start, avoiding potential issues down the road.
The bike/frame is new, it should be straight
Yes, in theory, this should be straight from the box, but particularly with new bikes that are built up there is a chance that the hanger could have been bumped or moved during freight. The first step in any drivetrain installation or new bike preparation is to check and adjust your derailleur hanger and the derailleur as required.
My hanger alignment seems to change between rides but I haven’t had an impact
Mounting bolts and nuts for derailleur hangers are essential for securing the hanger to the frame. Over time, these bolts can become loose due to vibrations and usage. It's crucial to periodically check and ensure that these bolts are tightened to the manufacturer's specifications.
In addition to the mounting bolts, the thru-axle or quick-release skewer can also play a role in securing the hanger. Make sure that these are tightened correctly as they provide a second point of strength.
If you've checked the mounting points and ensured that all bolts are properly tightened, and you're still experiencing shifting issues, it's possible that the hanger itself has been compromised. As we mentioned earlier, hangers are typically made from aluminum or other lightweight metals. Over time, especially if they've been straightened multiple times, the metal can weaken and lose its structural integrity. In this case, you may need to replace the hanger to restore proper shifting performance.
Wear and tear
If you've ruled out a bent derailleur hanger as the cause of shifting issues, the next step is to inspect the drivetrain components for wear and damage. Even seemingly minor issues with components can affect shifting performance. Here are some steps to follow when checking for wear and tear on your drivetrain components:
1. Chain: A worn chain will have the greatest effect on diminishing shift quality. A worn chain will have the greatest effect on diminishing shift quality. It's challenging to provide a specific timeframe for chain replacement because of these variables. However, using a chain wear checking tool, as recommended, is an effective way to monitor your chain's condition and determine when it needs replacement.
Regularly checking and replacing your chain at the wear limit will help maintain smooth and precise shifting. Regularly checking and replacing your chain at the wear limit will help maintain smooth and precise shifting.
Ultimately, the key is to be proactive in maintaining your drivetrain components and addressing any signs of wear or issues to ensure a reliable and efficient riding experience.
For the majority of our drivetrain systems, use an SRAM-approved chain wear tool to ensure an accurate reading. The use of an unapproved tool might cause you to replace a chain too early or too late. Remember to only replace your chain once it is at 0.8 stretch on an approved chain checking tool.
The only caveat to this is SRAM Eagle Transmission. Instead of conventioanl chain measuring, this system uses our Transmission Service Matrix
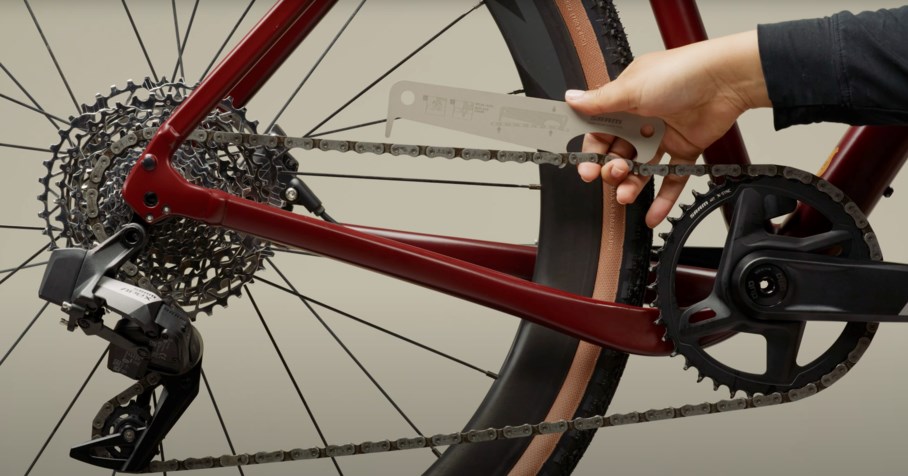
Measuring chain stretch is easy and requires some specific but not overly expensive tools
2. Cassette and Chainrings: Examine the cassette and chainrings for any worn or damaged teeth. Worn teeth can lead to poor shifting and chain skipping. If you notice any issues with these components, they may need replacement. Usually, the telltale sign of cassette damage will be shifting issues in just one cog.
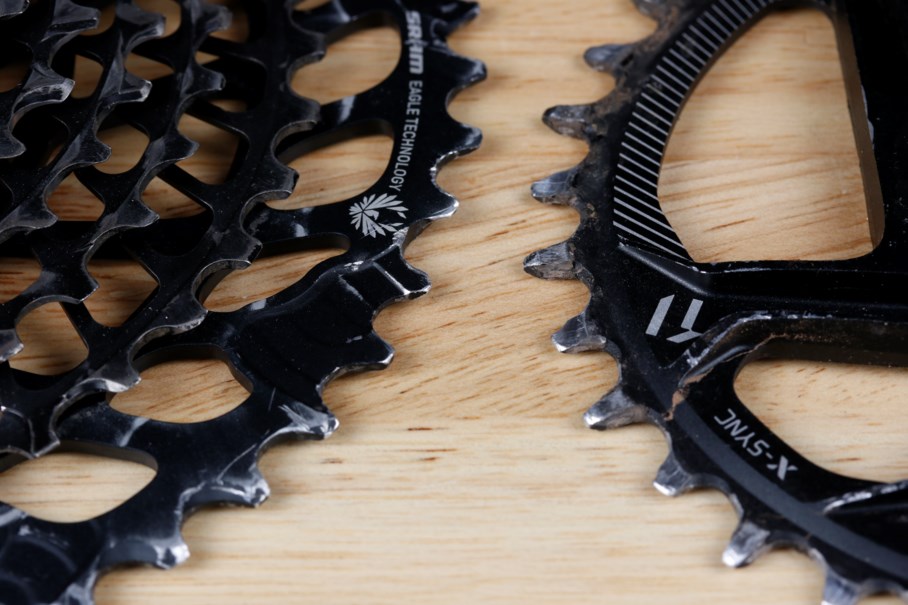
Cassette and Chainring starting to show wear
3. Derailleur Pulleys: The jockey wheels or pulleys on the rear derailleur can accumulate dirt and wear out over time. Clean and inspect them for damage. If they are excessively worn or damaged, consider replacing them.
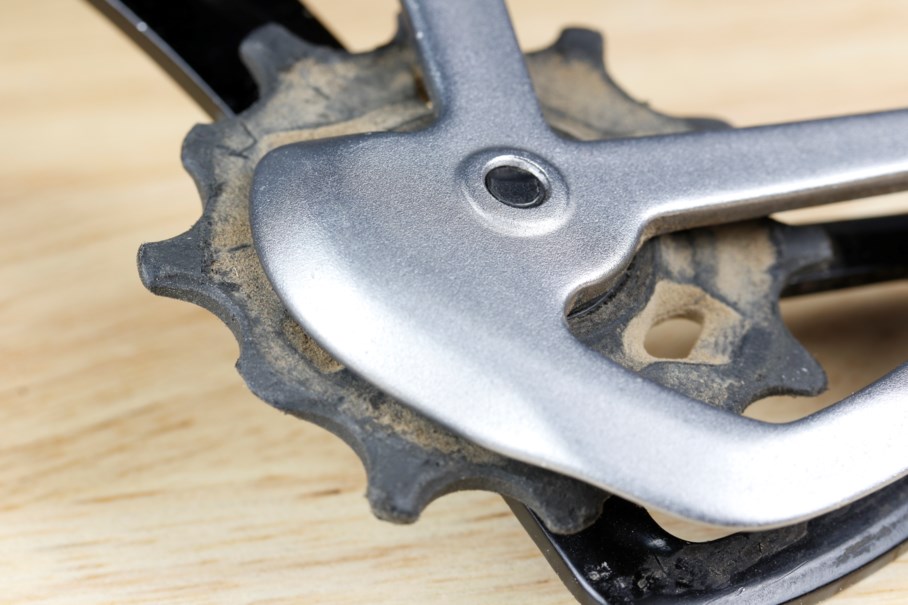
Derailleur pulley with worn teeth
4. Cable and Housing: Check the shifter cable and housing for any fraying, kinks, or damage. Damaged cables or housing can hinder smooth shifting. Replace any compromised parts.

Cable wear and tear can cause shifting issues
Compatibility
This may not be an issue for the majority of riders, but if your shifting has changed after installing new parts, it's important to make sure that they are compatible. There are a host of different parts from SRAM, whether it be 10, 11, or 12-speed, and some parts are not compatible together. We have all of our compatibility lists here. As a rule of thumb, you need to, at the very least, stick to your correct speed and intended ride type, i.e., 12-speed road parts with 12-speed road parts within their component ecosystem.
As for third-party components such as chains, chainrings, and derailleur cages, we cannot verify their performance or compatibility with your bicycle. Therefore, we do not approve or endorse their use with our drivetrain systems.
- e-MTB Compatibility Map
- 1x12 e-MTB, 1x11 e-MTB & EX1
- AXS Compatibility Map
- Road AXS, Eagle Drivetrain AXS, Eagle Transmission
- MTB Compatibility Map (2021)
- 1x12 Eagle, 1x12 Eagle AXS, 1x11 MTB, 1x7 MTB, 2x11 MTB & 3x10/2x10/1x10 MTB
- Road Compatibility Map (2023)
- 2x10, 2x11 &1x11 drivetrains
MicroAdjust or cable adjustment
Only after your derailleur hanger is in alignment and other wear and tear issues have been addressed, it is time to look into physical adjustments. Making physical adjustments before you have a solid foundation in place can cause more issues in the long run. If you've made any of the following adjustments to rectify shifting issues, please come back to this section after you've completed the steps outlined earlier in the article.
New gear cables are commonly said to stretch as they can go out of adjustment rather quickly unless bedded in whilst being serviced. Usually, the cables don't physically stretch but more so the cable ends will compress into place causing slack in the cable which needs to be readjusted.
There are two terms here, cable barrel adjustment, and Micro-Adjust. This is to separate our mechanical drivetrain systems and our AXS wireless drivetrain systems.
Mechanical Systems
SRAM Mechanical systems use an inner cable and cable housing, as we mentioned earlier in wear and tear. On all SRAM Mechanical systems, there will be a barrel adjuster, either on the rear derailleur or more commonly on the shifter (or, of course, both). When you adjust the barrel adjuster counter-clockwise, you are lengthening the outer cable, which puts more tension on the inner cable. If you spin this clockwise, you are shortening the outer cable, which will reduce tension on the rear derailleur.
Here's how to use this adjustment to help your gear shifting. Below, we have a great video explaining these adjustments and when to use them.
In short, if you are trying to shift from your smallest cog up to your second smallest cog and the derailleur is not shifting up, you want to incrementally twist the barrel adjuster clockwise to increase tension on the inner cable.
If you are trying to shift from your second smallest cog into the smallest cog, and the chain will not move down, then turning the barrel adjuster counterclockwise will decrease tension allowing the chain to drop to the smaller cog.
AXS Wireless Systems
SRAM AXS wireless systems, in most cases, will have no cables going into the derailleur. The only exception here is that some e-MTBs may have a power cord that plugs into our AXS system for power. You can identify AXS systems by the absence of shifting cables on the front of the bike and the rear derailleur making electric buzzes when shifting.
Although there is no shift actuation like a mechanical system (the relationship between the shifter and derailleur), we have what we call a 'Trim Position.' As each cog in the cassette is spaced the same, having this trim position set will ensure that all other gears will shift properly. This adjustment is a single position for the derailleur for the entire cassette, trim position cannot be set per cog. The trim adjustment can be done via the system controller or via the app. We have videos for both below:
Chain length
Having the chain length correct for your SRAM system is vital for a correctly functioning drivetrain. SRAM operates on a fixed position design and getting the correct distance between the upper pulley and the cassette (B-Gap) is critical. Please use the below links to reference your specific product to and find chainlength:
Chain gap
Let's talk about chain gap. Chain gap is one of the most critical but least understood aspects of your drivetrain. SRAM systems utilize a fixed mounting position upper guide pulley, which results in more responsive shifting than a tensioned system. In our 1x and 2x drivetrain systems, the offset of the pulley is designed to take up the slack of the chain, and this is where chain gap adjustment comes into play. If the chain gap is too close, we will not get the full range of our gears and can cause damage to our derailleur. On the other end of the spectrum, if we are too far away from the upper guide pulley and the cassette, our shifting will become slow and inconsistent. So, it's all a matter of getting things in the right place to maintain proper shifting.
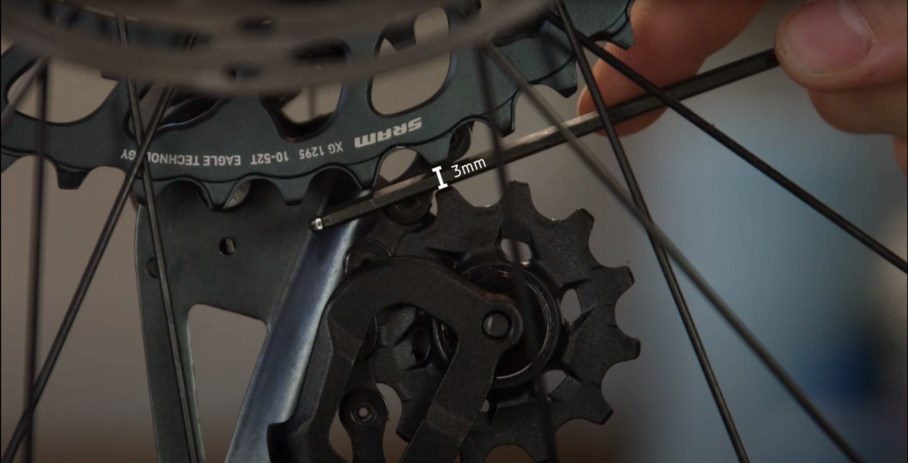
Chain gap on Eagle Drivetrain can be performed without the tool too
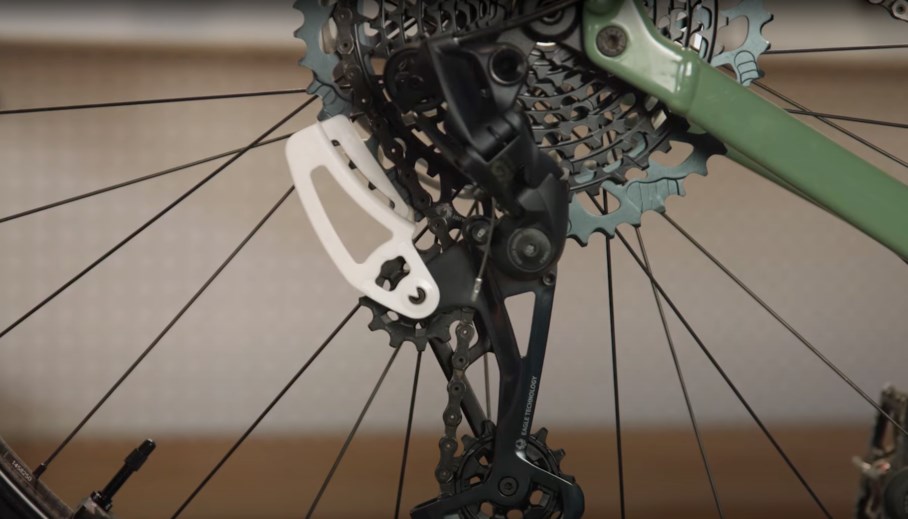
The chaingap tool makes setting chaingap easy
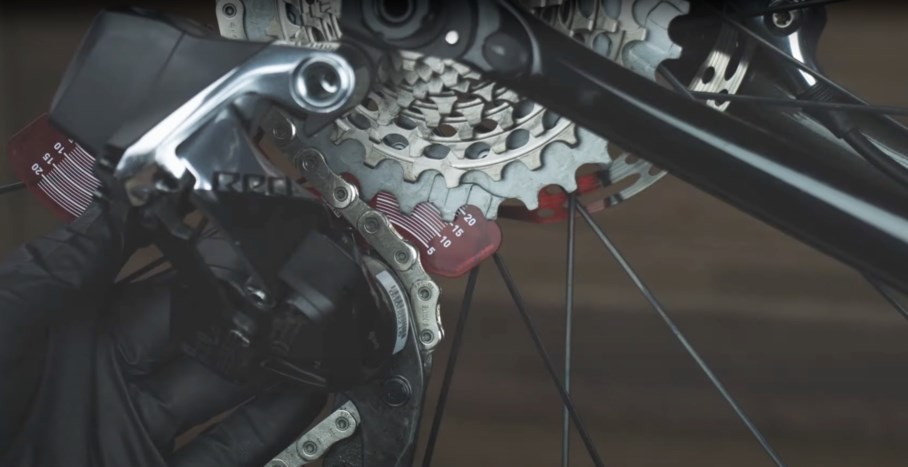
Road drivetrain uses a similar chain gap tool for precise set up
We have compiled the manuals for our current systems and linked them to the chain gap pages:
- RED, Force, Rival AXS systems
- 1x MTB Mechanical systems
- SRAM Eagle Drivetrain (1x12)
- SRAM Apex Mechanical
It is important to find the correct chain gap for your bike and use the correct method to set this up.
Wrap up
So we hope that some of these steps have helped in identifying any service-related issues you may be having with your rear derailleur. If you are still stumped we always suggest taking your bike to your local bike store for a professional mechanic to look at your bike.
Looking to Learn More?
SRAM has fantastic learning resources, such as our service website and SRAM Tech YouTube channel.