{{ data.msg }}

Your browser does not support all of our website’s functionality. For an improved shopping experience, we recommend that you use the most recent versions of Google Chrome, Safari, or Firefox.

Ride essentials for your Zipp AXS Wheels

Speed starts here. Zipp’s sole mission is making you faster, and we’re ready to help you get the most from your new wheels equipped with Zipp AXS Wheel Sensors. Learn the basics of your wheels before your first ride, whether you need tubeless setup tips or want to find the perfect tire pressure. Let's get started.


No Zipp AXS Wheel Sensors on your wheels? Start here.

Rider on Zipp wheels at sunset

Step 1: Activate your Zipp AXS Wheel Sensors

Both of your wheels seamlessly integrate Zipp AXS Wheel Sensors for accurate on-bike tire pressure monitoring. Next to your valve stems, you’ll notice an AXS logo and LED where the sensor is inserted directly into the rim. Activate each sensor in a few simple steps:

  • Remove the device from the rim by unscrewing the valve nut and pulling the device from its flat grooves.
  • Locate the red pull tab, indicating a battery insulator is installed.
  • Remove the tab to turn the sensor on for the first time.
  • Repeat the same steps for the sensor on your other wheel.

VIEW THE MANUAL

Step 2: Know your battery basics


The battery insulator ensures your Zipp AXS Wheel Sensors stay dormant during shipping. Once the insulator is pulled, the battery will power the Zipp AXS Wheel Sensor whenever your wheels move. Each sensor houses a replaceable CR2032 coin cell battery that will last approximately one year for most riders.

Step 3: Connect to the AXS App


As part of the AXS ecosystem, your Zipp AXS Wheel Sensors connect to the AXS app like any other AXS component. If you have a bike with an AXS drivetrain, you can add the sensors to your bike profile to monitor and personalize all your components in one place with no additional pairing procedure necessary. Once connected, you’ll be able to check your sensor’s battery life, set your target tire pressures, and update firmware.

Tech tip: Not seeing your sensor in the AXS app? Shake it to wake it. The sensor will time out if stationary for 10 minutes, so you may need to wake it up. 

Step 4: Complete tubeless setup

Mount tires


If tires aren’t already installed on your wheels, use our tire compatibility guide to select the best tire for your riding style and your rims. No matter your selection, tubeless tires can be tight when attempting to mount them, so begin by spraying soapy water on the tire bead and inside the tire channel to ease install. If your tire has directional arrows on the sidewall, be sure the arrows are pointing in the direction of wheel rotation before installing the beads of the tire onto the rim entirely.

Add sealant


Both your wheels come with a tubeless sealant syringe and a needle adaptor. You must use the provided syringe with the needle installed to inject sealant. This setup allows sealant to bypass the sensor unit and flow directly into the tire bed, which will keep your sensor and valve operating properly. Make sure to push the sealant syringe needle all the way down until you feel it bottom out on the tire before injecting sealant. Zipp AXS Wheel Sensors are completely waterproof, but flooding the unit with sealant can affect sensor performance.

Tech tip: Clean your sealant syringe and needle after each use by flushing hot water through it. If dried sealant clogs the needle portion of the syringe, you can slide an old derailleur cable inside to clear the clog.

Inflate tires

You’ll need to ensure your tire beads are seated before inflating to your desired pressure. Remove your valve core to allow maximum air flow for seating. Pump the tires to 30 PSI to start and know it’s normal to hear popping and cracking sounds while tire seats. Examine the line on the tire just above where it meets the rim. This line should have even spacing from the rim on both sides of the tire around the entire rim. If you notice uneven spacing, deflate and adjust the tire by hand where needed before reinflating and checking again.

Tech tip: Before fully inflating your tires, evenly distribute sealant into the sidewalls and tire bead interface by vigorously shaking your wheel up and down as though it’s rolling over a rough road. Repeat this process around the entirety of the rim by rotate the wheel 90 degrees as you go.

Composite image of rider going through setup process on new Zipp Axs Wheels
Related Image

Step 5: Dial in your tire pressure


Use the Zipp Tire Pressure Guide to determine your optimal tire pressure. You’ll input several key pieces of information like tire width, bike weight, and riding conditions to receive personal pressure recommendations. Once you’ve made your calculations, set your desired tire pressure for each Zipp AXS Wheel Sensor in the AXS app. Simply input your target pressure and pressure alert range. When your pressure goes above or below your set range, your sensor will alert you via its LEDs and in the AXS app.

Step 6: Get to know the light on your wheel sensor

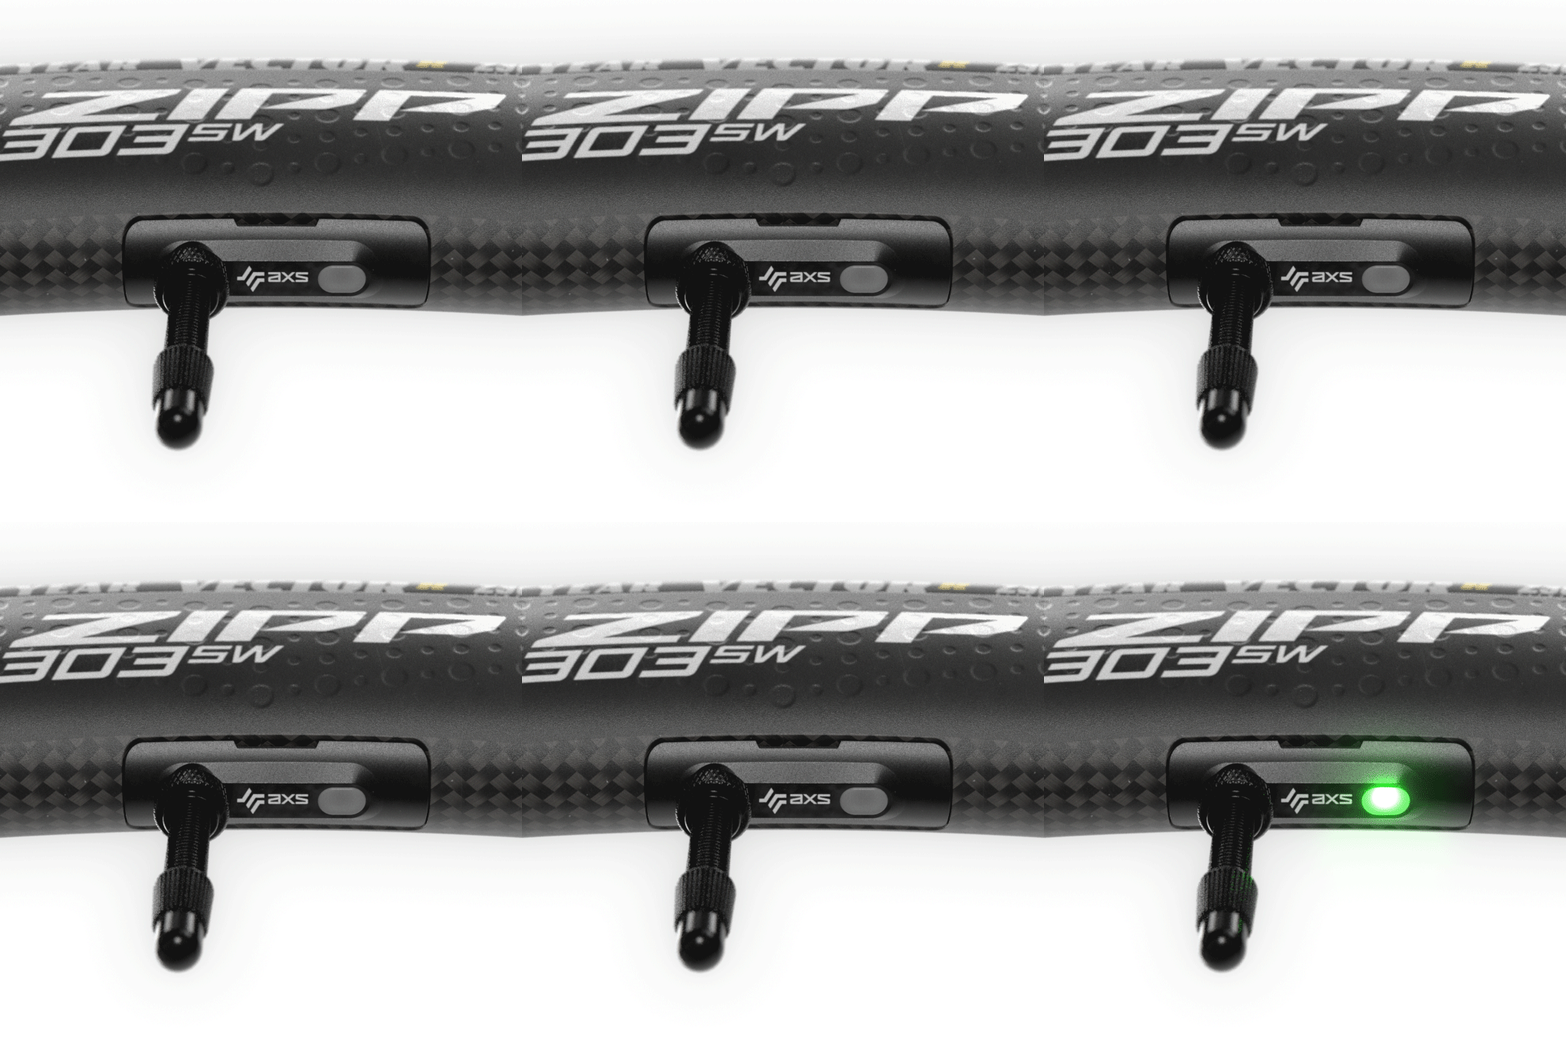
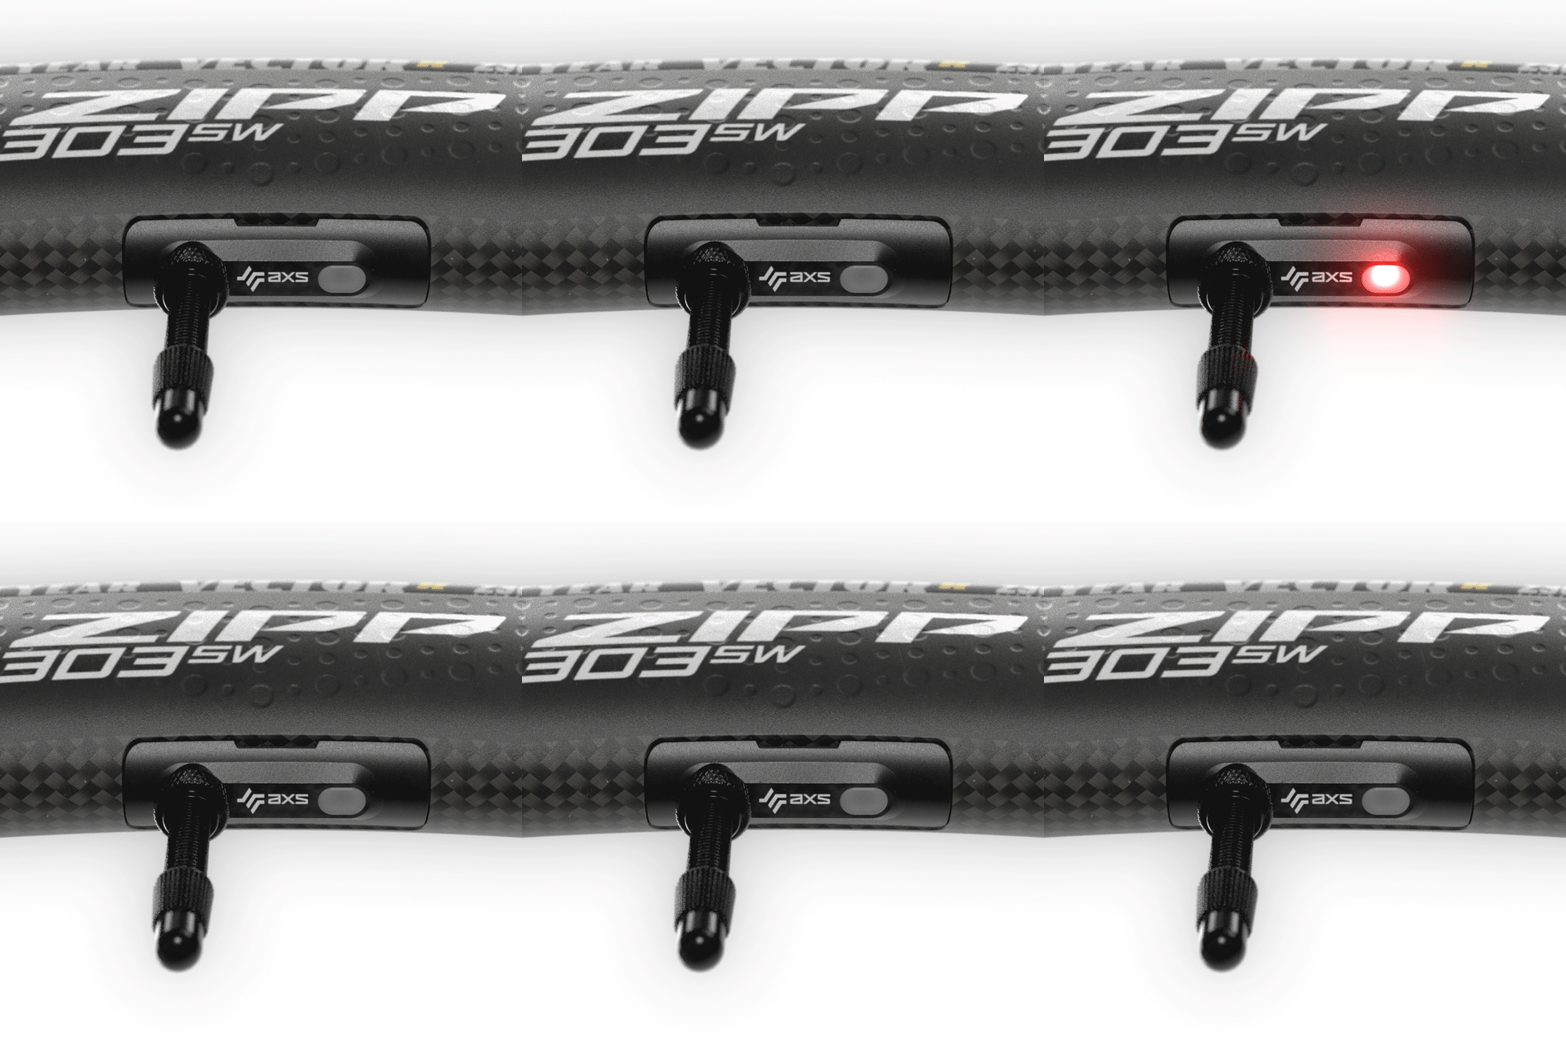
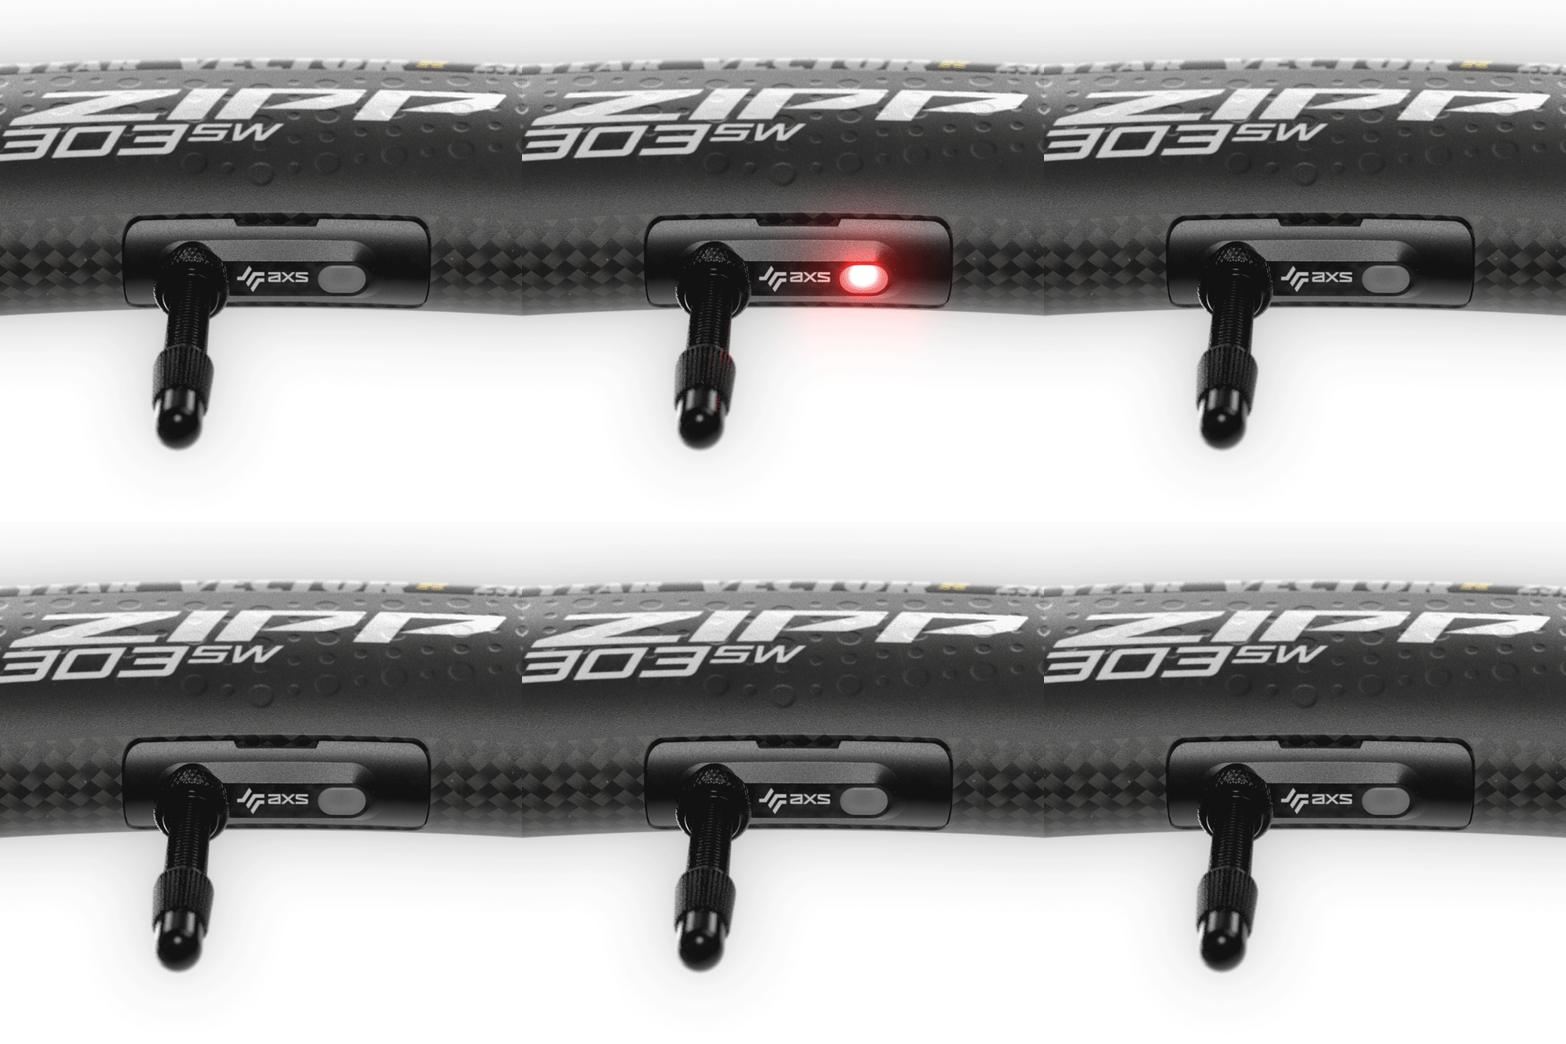
Green means go! When your tire pressure is within your set range, the LED on your Zipp AXS Wheel Sensor will illuminate with a slow flashing green. Should the pressure go above or below your range, you’ll see red. Note that the pace of the flash differs to indicate the following specifics:

  • Slow Green Flashing: Tire pressure is within normal/suggested range. 
  • Slow Red Flashing: Low tire pressure is detected. 
  • Fast Red Flashing: High tire pressure is detected. 
  • Fast Orange Flashing: Firmware is updating. 
Related Image

Tech tip: Wheel sensor battery status is not indicated via the LED. Battery status information is only available in the AXS app.

Related Image

Step 7: Connect to your bike computer


Monitor your tire pressure right on your head unit screen. Connect your Zipp AXS Wheel Sensors as you would any other ANT+ sensor on your bike computer. Hammerhead Karoo features custom graphical data fields for tire pressure so you can easily identify a pressure change while riding.

Step 8: Install rotors and bed in your brakes

Once your brake rotors are installed, your Zipp wheels are almost ready to hit the road. Before your first ride, you’ll want to find a quiet parking lot or open stretch of tarmac to perform our brake bed-in procedure. Bed-in consists of controlled slowing to gradually heat the braking surface while evenly embedding brake pad material into the disc rotor. Proper bed-in reduces brake noise, allows for consistent performance, and gives you up to 20 percent more braking power.

Related Image

Installing center lock rotors

Related Image

Bedding-in disc brakes

Step 9: Prepare your tubeless repair kit

When packing your tool roll or saddle bag with supplies for flat fixing, you’ll want to keep a couple key things in mind regarding your Zipp AXS Wheel sensors:

  • If you flat on a ride, any tube with a 60mm threaded valve stem can be installed through the sensor to get you back on the road.
  • If you install the Zipp Smart Tube that came with your wheels, your sensor will work as intended and read your tire pressure. Spare Zipp Smart Tubes are available separately.
Related Image

Step 10: Analyze your tire pressure data post ride


When your Zipp AXS Wheel Sensors are connected to your bike computer, tire pressure data will be captured during your ride so you can analyze it with online tools like Hammerhead Dashboard. See exactly which pressures helped you set your PR on that town line sprint.

Learn more

Tubeless and tire pressure tips

LEARN MORE

Wheel care and maintenance

LEARN MORE